Diesel charging system diagnostics
Credit to John Anello for the excellent example of a difficult and time consuming diagnosis
I had a shop call me for advice on a 2002 Dodge Ram Truck with a 5.9L diesel engine that had a charging system issue (Figure 1). I probably field at least 50-70 calls a day and there are many times that I will provide my shops with free tech advice over the phone. This issue seemed simple to me because Chrysler, for many years, has used a strategy to control their alternators externally. In the early days, they mounted voltage regulators on the firewall but once onboard computers came into play the regulator worked its way into the circuit board of the Engine Control Module. The alternator field circuit was usually fed an ignition feed and controlled by a ground feed on the opposing side of the field circuit.
The owner of the vehicle was a do-it-yourselfer and had changed the alternator with an aftermarket one but it did not resolve his problem. The truck was then shipped to the shop where they checked all the wiring and decided to opt for an OEM alternator to see if that would resolve the charging system issue (Figure 2). When this didn't work, the shop gave me the call.
Before I make the drive
I ran through all the steps with the shop technician and educated him on how the system should work and he mentioned that there was no power feed coming out of the PCM to feed the one side of the alternator field circuit. I explained to him that it was possible that the PCM was bad or that the PCM was sensing a partial short to ground in the feed line and was possibly turning off an internal driver to protect itself.
The next day the shop tech called me back to explain that he temporarily ran dedicated wires for both the power feed and triggering lines of the field control circuits between the alternator and PCM. The alternator still would not charge but if he supplied the 12 volts into the power feed circuit the alternator was charging fine so he decided that he was going to order up a rebuilt PCM unit from the dealer. I told him that once he purchased the PCM and installed it, to call me so that I could swing by and program it for him.
Later in the week I received the call that all was ready to go so I ventured out to his shop at the end of my day to program the PCM. Once I arrived there I set up my old Chrysler DRB III scan tool as a pass thru device with an interface cable to my laptop. I configured the PCM with the vehicle VIN number and then downloaded the necessary software into the PCM. The truck started up but guess what? We were back to square one. We both sat there scratching our heads and then I offered him to let me perform a full diagnostic on the vehicle in order to retrace ALL the steps that had been taken and he agreed.
Diving in a little deeper
I hooked up my scan tool and pulled codes from the PCM. One code was P1765 that indicated a loss of ignition feed to the transmission relay and the other code was a P0622 indicating that the generator field was not switching properly (Figure 3). These codes both had a common power feed issue because the PCM was still not sending the 12-volt output required to satisfy their circuits. There had to be a reason why the PCM was not doing its job and I decided to look at some data PIDs hoping to find a piece of the puzzle that could guide me in the right direction.
When I was viewing the data I saw something that raised my eyebrows. There was no RPM signal getting to the PCM and the desired charging voltage was 0 volts (Figure 4). The PCM was not performing its task of charging the alternator because as far as it was concerned the vehicle was not running. So then how was this vehicle running without an RPM signal? Why didn’t the PCM set a code for loss of RPM signal input? I now have to pull some diagrams to do some onsite strategy research because at this point I had no answers.
This vehicle was a diesel and was a horse of a different color because it used a separate Engine Control Module that was specifically used to run the Diesel engine. The crank sensor fed a direct RPM signal to the ECM and there was a cam sensor signal that was also supplied to the ECM coming from the engine driven injection pump. The ECM in turn would output an RPM signal to the PCM so that it could properly control the transmission and the alternator. So I now had to run some tests on the ECM to determine what was going on.
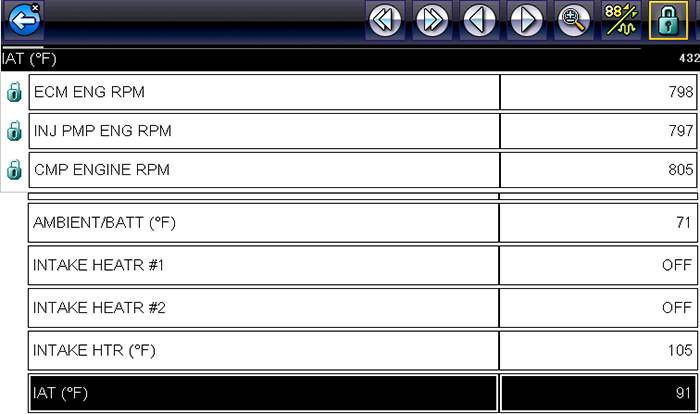
I scanned the ECM and found a code P1693 which indicated a fault in the PCM so I kind of ignored this code because the ECM was playing the “Blame Game” (Figure 5), I next looked at some ECM PIDs and found that it was receiving the RPM signal from the crank sensor and an RPM signal from the cam sensor (Figure 6). The ECM inputs did not seem to be an issue so now I was leaning towards an output signal issue with the circuit going back to the PCM but at this point I needed access to the ECM so I could put my scope on the signal lines.
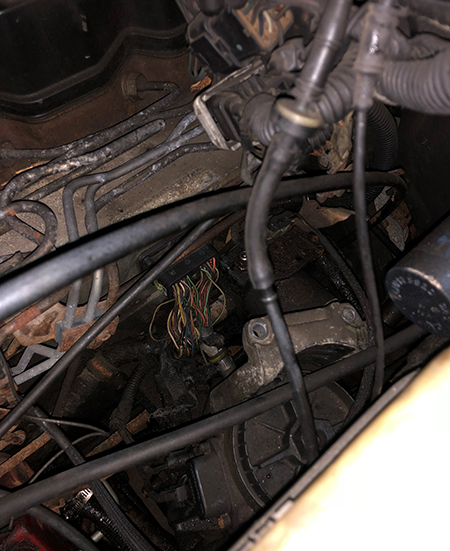
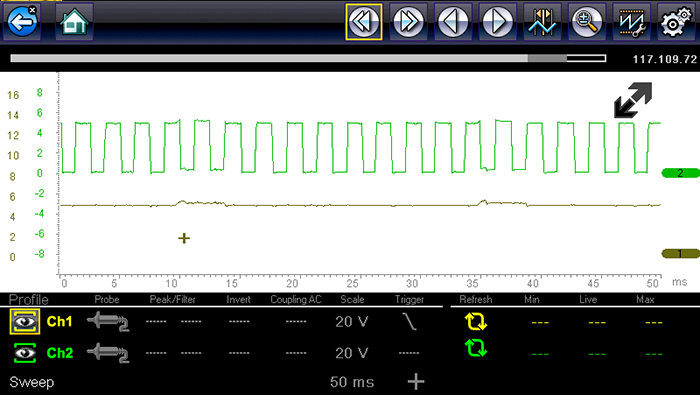
I had the shop pull the fuel filter housing on the left side of the engine block to gain access to the ECM that was mounted to the side of the block (Figure 7). I placed my scope lead on the RPM output signal to the PCM on channel 1 and placed my other scope lead on the crank sensor RPM Input signal to the ECM on channel 2. I started the vehicle and you could see that the crank sensor RPM signal to the ECM was fine with good triggering transitions from 0-5 volts but the RPM output signal to the PCM was flat lined at 5 volts (Figure 8). The PCM signal line was not shorted because it was elevated at about 5 volts.
I next decided to think out of the box by opening the RPM signal line at the PCM and sending the RPM signal from the Crank sensor into the PCM to simulate that the engine was running to test PCM system strategy. My results were as expected because the alternator started to charge immediately. I went back to view the PCM data and you could now see that the desired voltage was 13.8 Volts and the charging voltage was also 13.8 volts. It would have been nice to just leave it at that just to get the truck out the shop door but the issue now was the PCM was seeing the vehicle running at 2528 RPMs when actually the truck was idling at 700 RPMs (Figure 9).
In the end
The ECM on this truck most likely took the crank sensor signal input and internally reduced the frequency of the signal delivered to the PCM for some type of strategy reason. There was an internal circuit board failure and the only choice was to have the ECM sent out for repair because there was not one available from the dealer or aftermarket due to the age of the vehicle. I just feel bad for the owner of the vehicle because this was a work truck and the shop owner never knew what a nightmare it would turn out to be and how long he would have it in his possession.
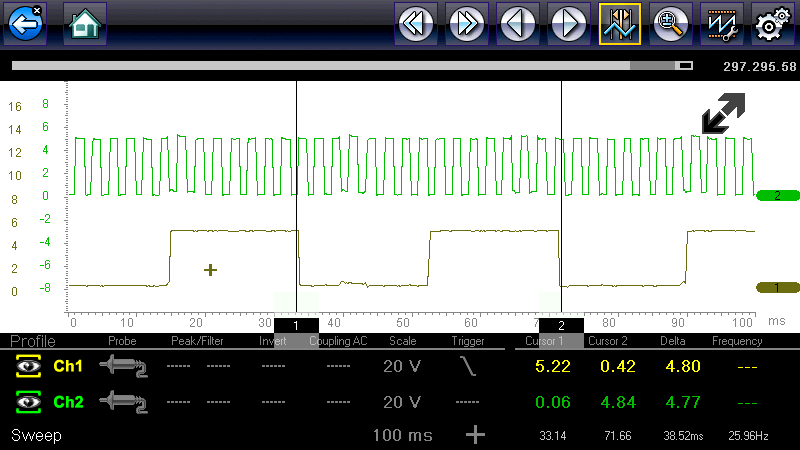
Okay so about another week goes by and the rebuilt ECM finally showed up and the shop installed the ECM which was a "plug and play" unit. The vehicle started up and the good news is that everything worked like a charm. I had to go back to just get a scope pattern out of this diesel monster and to validate the repairs before the shop buttoned it all up. I quickly hooked my scope up again to view the patterns and you could now see the input and output RPM signals were working as designed with different frequencies (Figure 10).
This vehicle really proves that a trouble code does not always lead you down the right path. It is vitally important to know how to read data PIDs. The code in the PCM only validated that the alternator field circuits had a power feed or switching ground issue that was pointing you to a wiring fault or a possible bad PCM with an internal alternator field driver failure. There was no cam signal reference to the PCM like there would be in a gas engine so there was no way for the PCM to fail the crank sensor for a lack of input. The strategy of this system would be for the PCM to provide a voltage output and field circuit toggling once a specific RPM threshold was met but this never took place. In the end it took some out of the box thinking to unmask the true culprit. My only hopes are that this story will enhance what you know or don’t know about Chrysler diesel controllers working in tandem.
The owner of the vehicle was a do-it-yourselfer and had changed the alternator with an aftermarket one but it did not resolve his problem. The truck was then shipped to the shop where they checked all the wiring and decided to opt for an OEM alternator to see if that would resolve the charging system issue (Figure 2). When this didn't work, the shop gave me the call.
 |
| Figure 2 |
Before I make the drive
I ran through all the steps with the shop technician and educated him on how the system should work and he mentioned that there was no power feed coming out of the PCM to feed the one side of the alternator field circuit. I explained to him that it was possible that the PCM was bad or that the PCM was sensing a partial short to ground in the feed line and was possibly turning off an internal driver to protect itself.
The next day the shop tech called me back to explain that he temporarily ran dedicated wires for both the power feed and triggering lines of the field control circuits between the alternator and PCM. The alternator still would not charge but if he supplied the 12 volts into the power feed circuit the alternator was charging fine so he decided that he was going to order up a rebuilt PCM unit from the dealer. I told him that once he purchased the PCM and installed it, to call me so that I could swing by and program it for him.
Later in the week I received the call that all was ready to go so I ventured out to his shop at the end of my day to program the PCM. Once I arrived there I set up my old Chrysler DRB III scan tool as a pass thru device with an interface cable to my laptop. I configured the PCM with the vehicle VIN number and then downloaded the necessary software into the PCM. The truck started up but guess what? We were back to square one. We both sat there scratching our heads and then I offered him to let me perform a full diagnostic on the vehicle in order to retrace ALL the steps that had been taken and he agreed.
Diving in a little deeper
I hooked up my scan tool and pulled codes from the PCM. One code was P1765 that indicated a loss of ignition feed to the transmission relay and the other code was a P0622 indicating that the generator field was not switching properly (Figure 3). These codes both had a common power feed issue because the PCM was still not sending the 12-volt output required to satisfy their circuits. There had to be a reason why the PCM was not doing its job and I decided to look at some data PIDs hoping to find a piece of the puzzle that could guide me in the right direction.
 |
| Figure 3 |
 |
| Figure 4 |
This vehicle was a diesel and was a horse of a different color because it used a separate Engine Control Module that was specifically used to run the Diesel engine. The crank sensor fed a direct RPM signal to the ECM and there was a cam sensor signal that was also supplied to the ECM coming from the engine driven injection pump. The ECM in turn would output an RPM signal to the PCM so that it could properly control the transmission and the alternator. So I now had to run some tests on the ECM to determine what was going on.
 |
| Figure 5 |
 |
| Figure 6 |
 |
| Figure 7 |
I next decided to think out of the box by opening the RPM signal line at the PCM and sending the RPM signal from the Crank sensor into the PCM to simulate that the engine was running to test PCM system strategy. My results were as expected because the alternator started to charge immediately. I went back to view the PCM data and you could now see that the desired voltage was 13.8 Volts and the charging voltage was also 13.8 volts. It would have been nice to just leave it at that just to get the truck out the shop door but the issue now was the PCM was seeing the vehicle running at 2528 RPMs when actually the truck was idling at 700 RPMs (Figure 9).
 |
| Figure 8 |
 |
| Figure 9 |
The ECM on this truck most likely took the crank sensor signal input and internally reduced the frequency of the signal delivered to the PCM for some type of strategy reason. There was an internal circuit board failure and the only choice was to have the ECM sent out for repair because there was not one available from the dealer or aftermarket due to the age of the vehicle. I just feel bad for the owner of the vehicle because this was a work truck and the shop owner never knew what a nightmare it would turn out to be and how long he would have it in his possession.
Okay so about another week goes by and the rebuilt ECM finally showed up and the shop installed the ECM which was a "plug and play" unit. The vehicle started up and the good news is that everything worked like a charm. I had to go back to just get a scope pattern out of this diesel monster and to validate the repairs before the shop buttoned it all up. I quickly hooked my scope up again to view the patterns and you could now see the input and output RPM signals were working as designed with different frequencies (Figure 10).
 |
| Figure 10 |

No comments:
Post a Comment